PATHSPOT COOLDOWN PROBES
STARTER GUIDE and FAQs - August 2023
We are grateful to be partnering with you, and are looking forward to making your process for logging TCS cooling processes easier!
After you’ve received your Cooldown Probes, if you haven’t yet set up a PathSpot gateway, you’ll need to follow a separate set of instructions. Once this is complete, here are some commonly asked questions about PathSpot’s cooldown platform.
Initial Setup - IF YOUR PROBES CAME PRE-LABELED, YOU MAY SKIP THIS SECTION
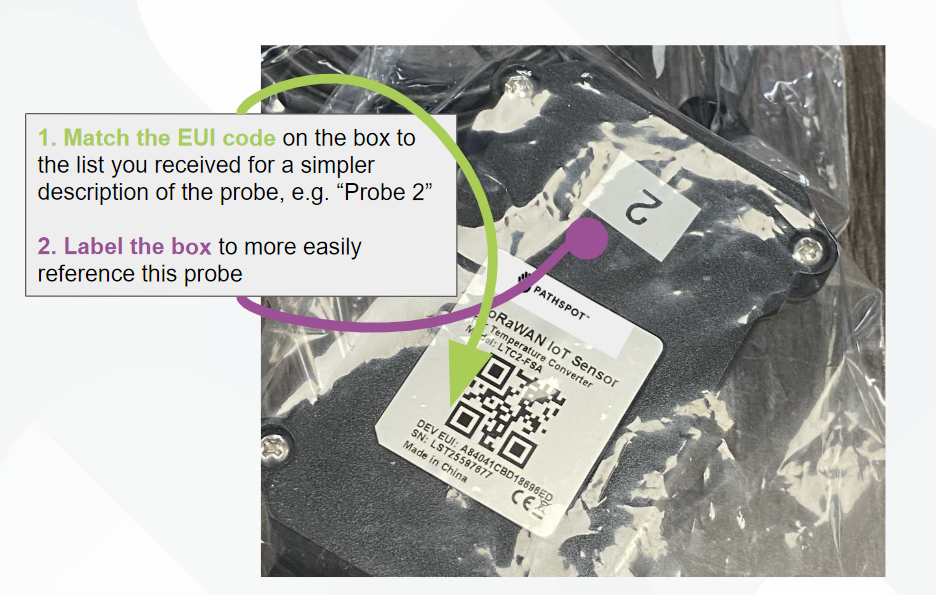
You will receive a list of “EUI” Codes and the corresponding Probe #. Be sure to label the probe appropriately, or go into your dashboard to name the probe as desired.
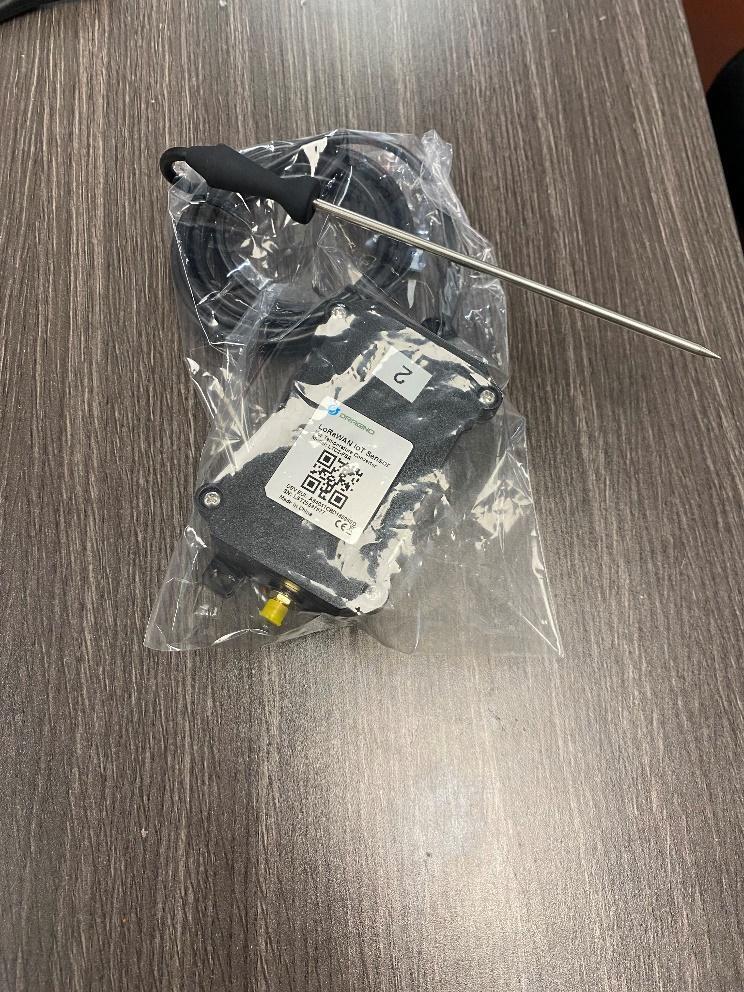
Do I need to use the antenna?
It is recommended that you affix the antenna that was included with each probe to the top of the black box to ensure the strongest possible connection.
Maintaining a Sanitary Environment
It is recommended that the cooldown probe “box” does not directly touch any RTE food. A colorfully contrasting bag is recommended to house the hardware. The colors will help ensure that this plastic does not accidentally end up in food!
Between batches be sure to sanitize any portion of the probe hardware that may come into contact with food, including the silver metal probe, as well as the black handle.
Starting a Process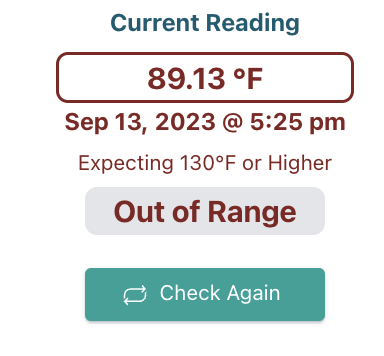
As soon as your TCS food is beginning to enter the temperature danger zone, be sure that the probe is inserted.
A minimum temperature may be set to ensure that no processes can begin after the food has cooled too much. The default minimum is 130ºF - contact PathSpot if you’d like to adjust this. Use the “Check Again” button to refresh the readings if you have just inserted the probe.
Starting a Process Retroactively
If you started the process after the probe was inserted and the current temperature is under 130ºF, you can click the “Select Start” button to pick the process start. This feature will be available for any process start regardless of the current probe temperature reading.
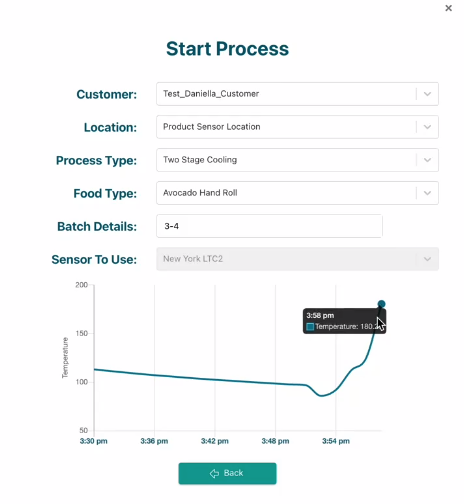
On the Start Process pop up, you will be able to select any start point within the past 30 min that is above the 130ºF limit - Reach out to PathSpot support if you would like to change the time or the temperature restriction.
What happens if I select the wrong ingredient type, can I change it later?
If you are unsure, select a generic option such as “General Sushi Roll”. For right now, retroactively changing an ingredient involves submitting a ticket to PathSpot Support. This feature is being evaluated and may become available in the future.
Can I add ingredients to the pick-down menu?
Yes - for right now, please email support@pathspot.com and we will get this done for you.
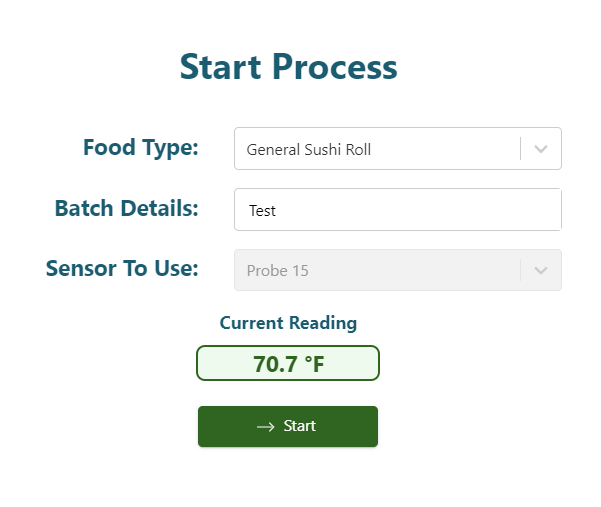
Calibration
To calibrate your cooldown probes, for right now, we recommend that you follow the same steps that you would to start a process. After filling out “filler” information, and selecting the probe you’re calibrating, click next. You will see the current reading from the probe. To avoid failed processes, do not click Start!
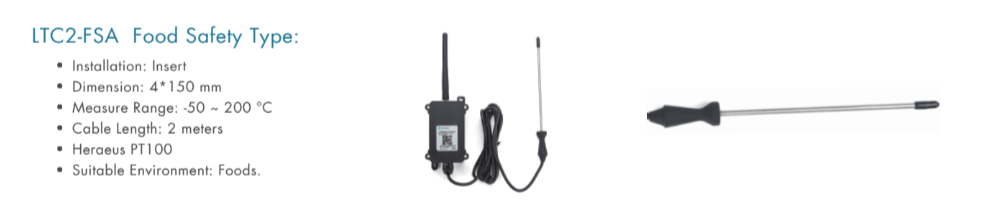
An overview of the manufacturer’s specifications can be found here:
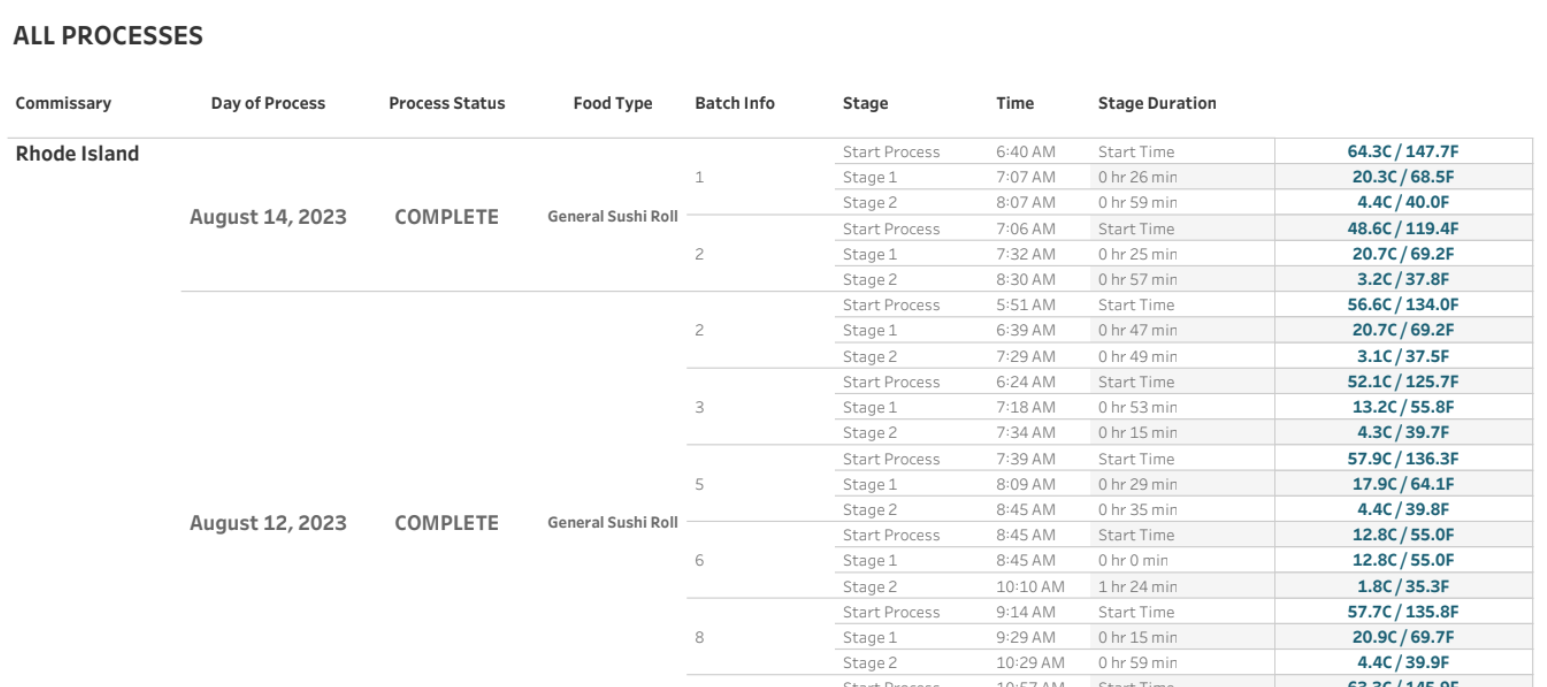
How can I easily and succinctly export my data?
Beginning in November 2023, you will be able to easily export your data in a format that looks similar to the following. Before this on-demand export feature is live, work with your PathSpot point of contact to get a report delivered to you on the cadence that you need.
Monitoring Cooldown Processes:
- Navigate and login to PathSpot.app
- On the navigation bar on the left, open the Sensor option and click
on the Sensor Processes option.- If you do not see either of these options, please contact PathSpot Support (support@pathspottech.com)
- On the cooldown process main page, you will be able to see all
active and past cooldown processes. - For each process you will be able to see several details:
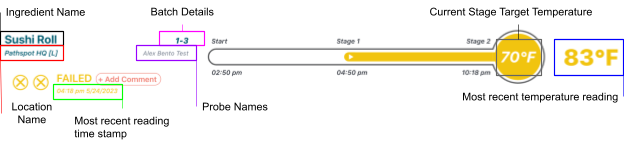
- Two circles at the bottom left of the process container will indicate the status of each individual stage:
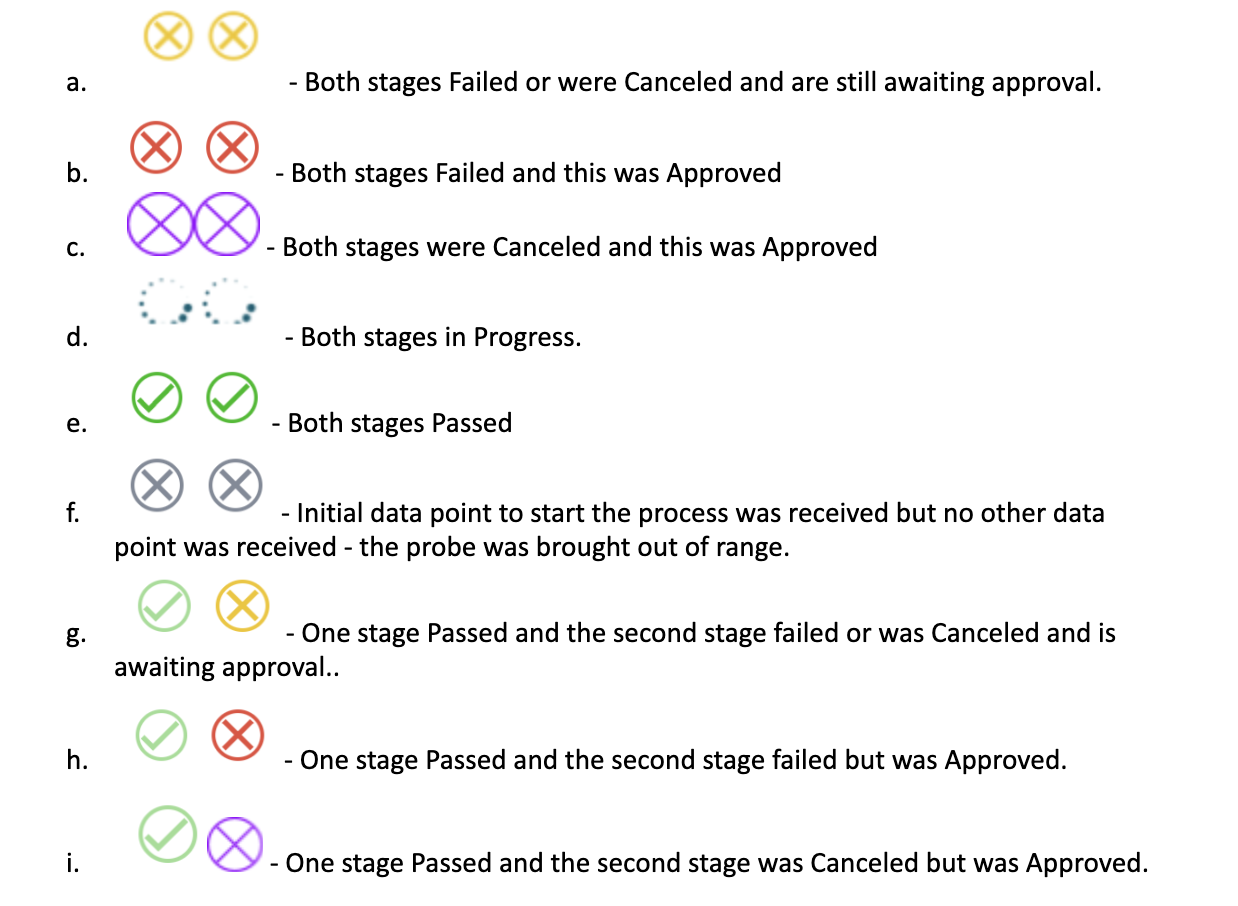 Each process will look different depending on the status :
-
- Failed: A process that fails and is approved by a process approver. The Time Stamp shown below the status will be that of when the probe failed. The times shown under each stage title on the visualization will show the time where the stage was either passed (if it failed in Stage 2) or the time where the stage should’ve ended.

-
- In Progress: The Time Stamp shown below the status will be that of the most temperature reading shown at the rightmost part of the process section. The times shown under each stage title on the visualization will show the time where the stage was either passed (if it passed Stage 1) or the time where the stage should end at the MAX.

-
- Canceled: A process that is canceled and is approved by a process approver. The Time Stamp shown below the status will be that of the most temperature reading (shown on the rightmost side of the cooldown section) before it was canceled . The times shown under each stage title on the visualization will show the time where the stage was either passed (if it passed Stage 1) or the time where the stage should’ve ended before it was canceled.
- Needs Review: The Time Stamp shown below the status will be that of the most recent temperature reading (shown on the rightmost side of the cooldown section) before it was canceled or it failed. The times shown under each stage title on the visualization will show the time where the stage was either passed (if it passed Stage 1) or the time where the stage should’ve ended before it was canceled or failed.

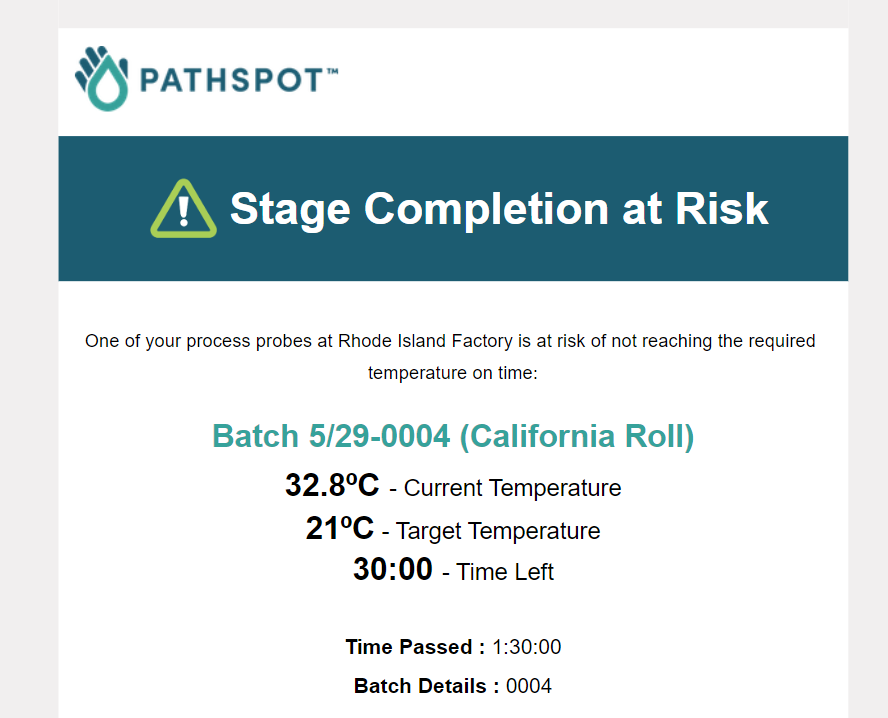
What alerts are available to me?
The system will send you alerts any time a process is close to ending. The following variables are configurable by contacting a member of the PathSpot team:
- How long before the process ends do you want to be notified if the probe has not reached the appropriate temperature? - Default: 30 min
- Is this the same for each stage? - Default: yes
- Who should be notified via email?
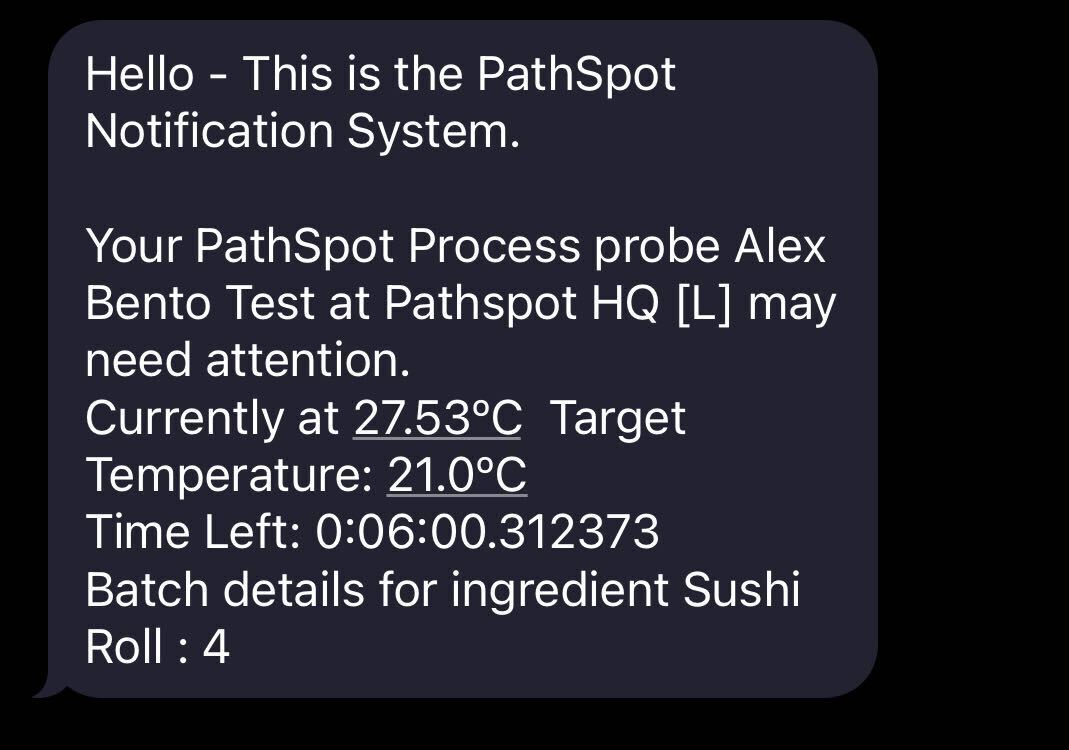
- Who should be notified via text?
Sample Text:
Sample Email: