
🕒 Managing Digital Prep Expirations & Color Stages
PathSpot's Digital Prep Expiration Management feature allows teams to digitally track ingredients as they move through different phases of the kitchen. Each phase is tied to a color-coded expiration status, making product usage and expiration compliance clear and easy for all kitchen staff to understand.
This article explains how to adjust ingredient expiration settings and customize the amount of time associated with each color stage.
-
📖 For a complete user guide and a walkthrough of the end-user experience, click here.
🔧 Adjusting Ingredient Expiration Settings
Users with the appropriate permissions (typically Admin-level access) can make adjustments to ingredient expiration settings at any time through the PathSpot Dashboard.
There are two key settings to understand:
- Total Expiration: The total amount of time an ingredient is good for before it expires.
- Color Stages: The amount of time an ingredient remains in each color status before transitioning to the next stage.
Example:
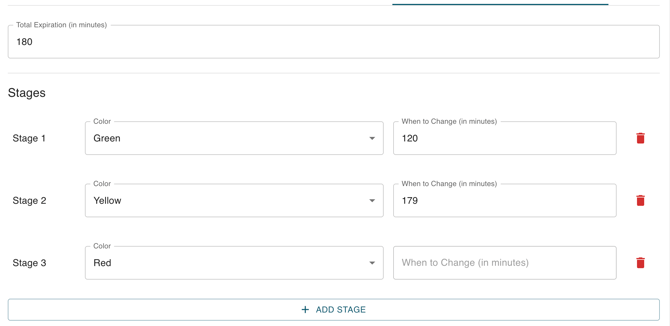
Let's use an ingredient with a total expiration window of 3 hours (180 minutes) as an example.
The expiration settings would work as follows:
- 🟢 Stage 1 – Green (0–120 minutes): Once the ingredient is pulled (created), it will remain green for the first 2 hours.
- 🟡 Stage 2 – Yellow (121–179 minutes): At 2 hours and 1 minute (121 minutes), the ingredient will turn yellow. It will remain yellow until it reaches 2 hours and 59 minutes (179 minutes).
- 🔴 Stage 3 – Red (180 minutes): At the 3-hour mark, the ingredient will turn red, indicating that it has reached its expiration time.
- > More than 3 stages can be created
⏱️ Customizing Your Color Stages
You can adjust the timing of each stage to give employees more or less time to use ingredients before they expire.
For example, if you move the yellow-stage threshold from 120 minutes to 110 minutes, the ingredient will enter the yellow stage 10 minutes earlier. This gives employees an additional 10 minutes of warning that the product is approaching expiration.
Adjusting these stages allows you to customize expiration warnings based on your kitchen's workflow, helping encourage faster product usage while providing employees with the appropriate amount of time to use ingredients safely and efficiently.
💡 Pro Tip: Consider your team's workflow when setting expiration stages. Giving employees enough time in the yellow stage can provide an extra visual reminder to use ingredients before they reach expiration.
📹 Video Guidance