Hardware Overview
The PathSpot solution pairs via WiFi OR Bluetooth to Brother printer models TD2350D203 and TD2350D300.These coming sections will walk you through what each button on the printer does and how to set it up to start printing
> Learn how to calibrate your printer here
> Learn how to connect your printer here


Getting Started
As soon as you receive the Brother Printer, carefully remove all pieces from the box. You will receive the following items:
- Printer
- Power cable
- Media roll holder
- USB cable - Make sure to store somewhere safe
Setting up your Printer:
To set up your printer, find a flat surface without clutter that is close to a power source. Once the printer has been set down, follow the steps below:
- Plug the power page to a power source and then connect it to the printer.

- Remove the blue tape on the front of the printer.
- Open the printer, using the cover release levers on the left and right side of the printer (towards the front).

- Insert the label roll so that the labels are facing up.

- Use the adjuster dial to lock the toll guides in the appropriate position

- Feed the roll paper under the media guides and pull the paper so that some of the labels are outside of the printer.

- Close the Compartment.

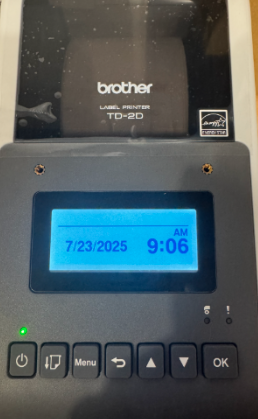
- Press the power button once until the orange power light turns on
- Once the light turns on, wait up to 5 sec until the light turns to green.
- You will now be directed to enter the current Date and Time:
- Press the up or down arrow to set the year, and then press OK. Repeat this step for setting the Month and Year.
- Press the up or down arrow to set the Hour, and then press OK. Repeat this step for setting the Minute and format (AM,PM, 24 hours).
- Once this is successful, you will see a green light on the printer with the date and time displayed on the screen.