
PowerTemp Set-Up Guide
This document will provide you simple instructions on how to set up your PowerTemp system. The PathSpot team will be sending additional details via email to aid you in a hassle free installation!
Installation Materials
 .
. 
LoRaWAN Sensor (+ optional probe) LoRaWAN Gateway
2 zip-ties & 3M adhesive (magnets available upon request). .
.  .
. 
Questions? Need help? Please contact PathSpot Support at: support@pathspottech.com
Call or Text (718) 550-0040
LoRaWAN Gateway:
Don’t Press the small RESET button -This will clear the PathSpot configurations of the Gateway and will no longer be able to connect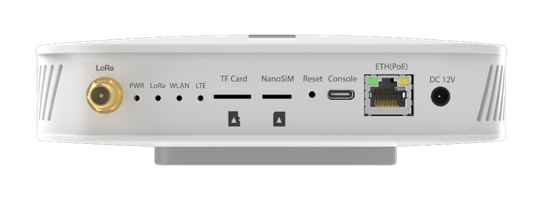
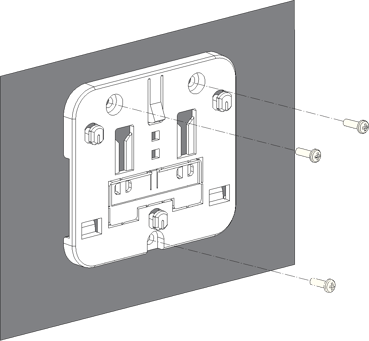
Mounting the gateway bracket:
The gateway supports wall-mounting and ceiling-mounting. You can choose one according to your needs.
Wall Mounting
- Use a 5-millimeter drill bit to drill three (3) holes on a wall. It is recommended to mark the location of the holes on the wall before drilling.
- Insert the expansion tubes into the drilled holes.
- Secure the bracket to the wall using screws through the holes in the bracket.
Ceiling Mounting
- Choose self-tapping screws or expansion tubes and self-tapping screws to install the bracket according to the actual material of the ceiling.
- (Optional) Refer to this step when installing the bracket using expansion tubes and self-tapping screws. Otherwise, skip it.
- Use a 5-millimeter drill bit to drill three (3) holes in the ceiling.
- Insert the expansion tubes into the holes drilled in the ceiling.
- Secure the bracket to the ceiling using self-tapping screws through the holes in the bracket.
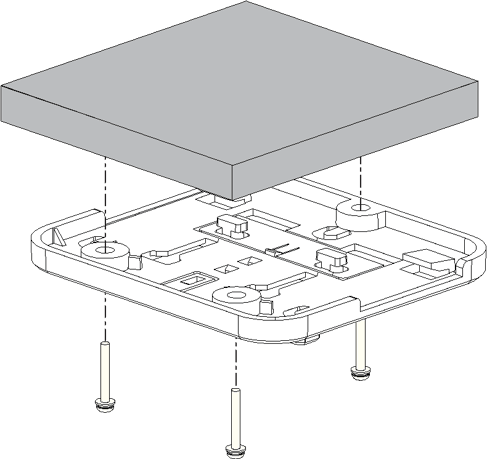 Figure 4:
Install the Gateway
- Align the lower edge of the gateway's hanging hole with the bracket's locking plate.
- Move the gateway closer to the bracket so that the bracket's locking plate enters the gateway's hanging hole.
- Pull the gateway to ensure that the gateway is in place.
- Attach the LoRa antenna by screwing it onto the RP-SMA connector on the gateway.

Partner Configured Gateways (Standard):
By default, the gateway will work in Wi-Fi AP Mode which means that you can find an SSID named like "RAK7268V2_XXXX or RAK7268CV2_XXXX" on your PC's Wi-Fi Network List. "XXXX" is the last two bytes of the Gateway MAC address.
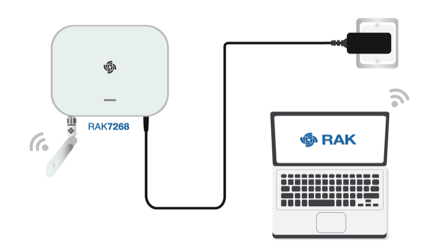
Step-by-Step Instructions Wi-Fi Connection:
- Plug the Gateway to power – Make sure this is as close to the wifi router as possible as this will improve wifi stability.
- Connect to the gateway’s Wi-Fi.
- Open a web browser and enter the IP address:
192.168.230.1 - On the first login, you must set a login password. The password must:
- At least 12 characters long
- Has at least one special character (
!“#$%&\‘()*+,-./:;<=>?@[]^_{|}~) - Has at least one number
- Has at least one standard Latin letter (used in the English alphabet)
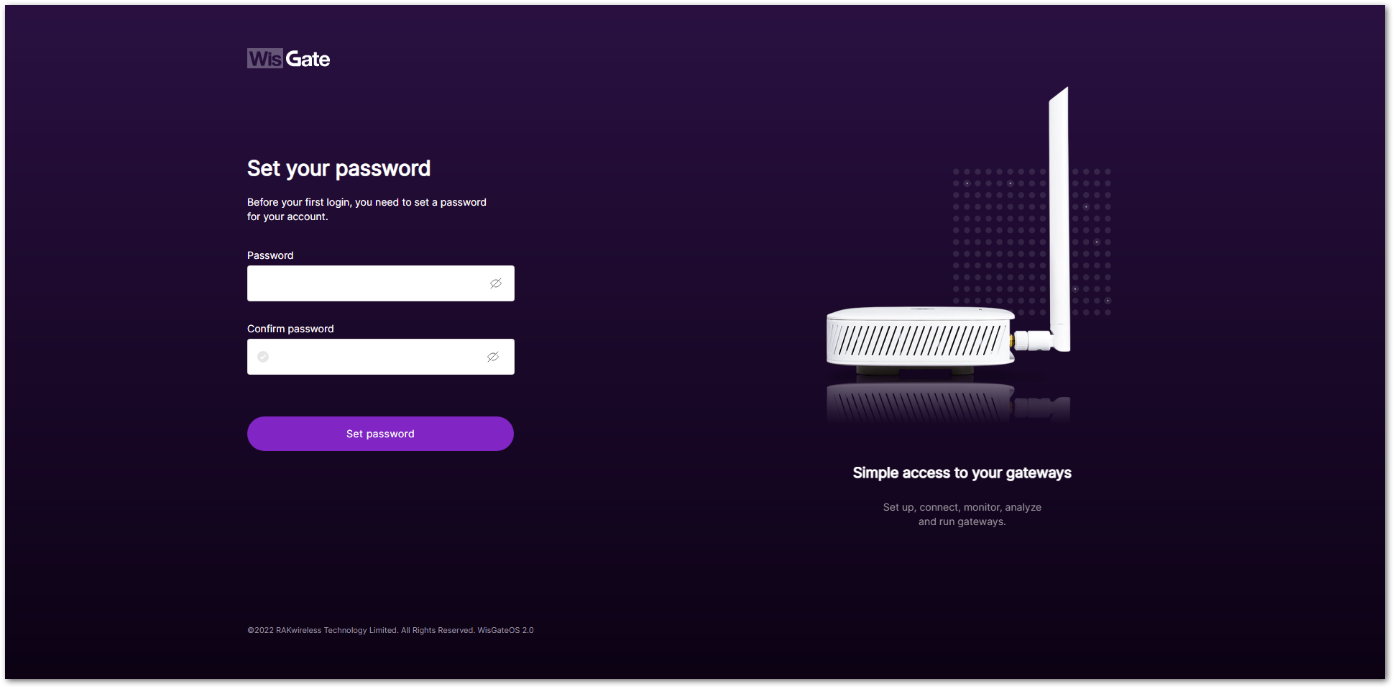
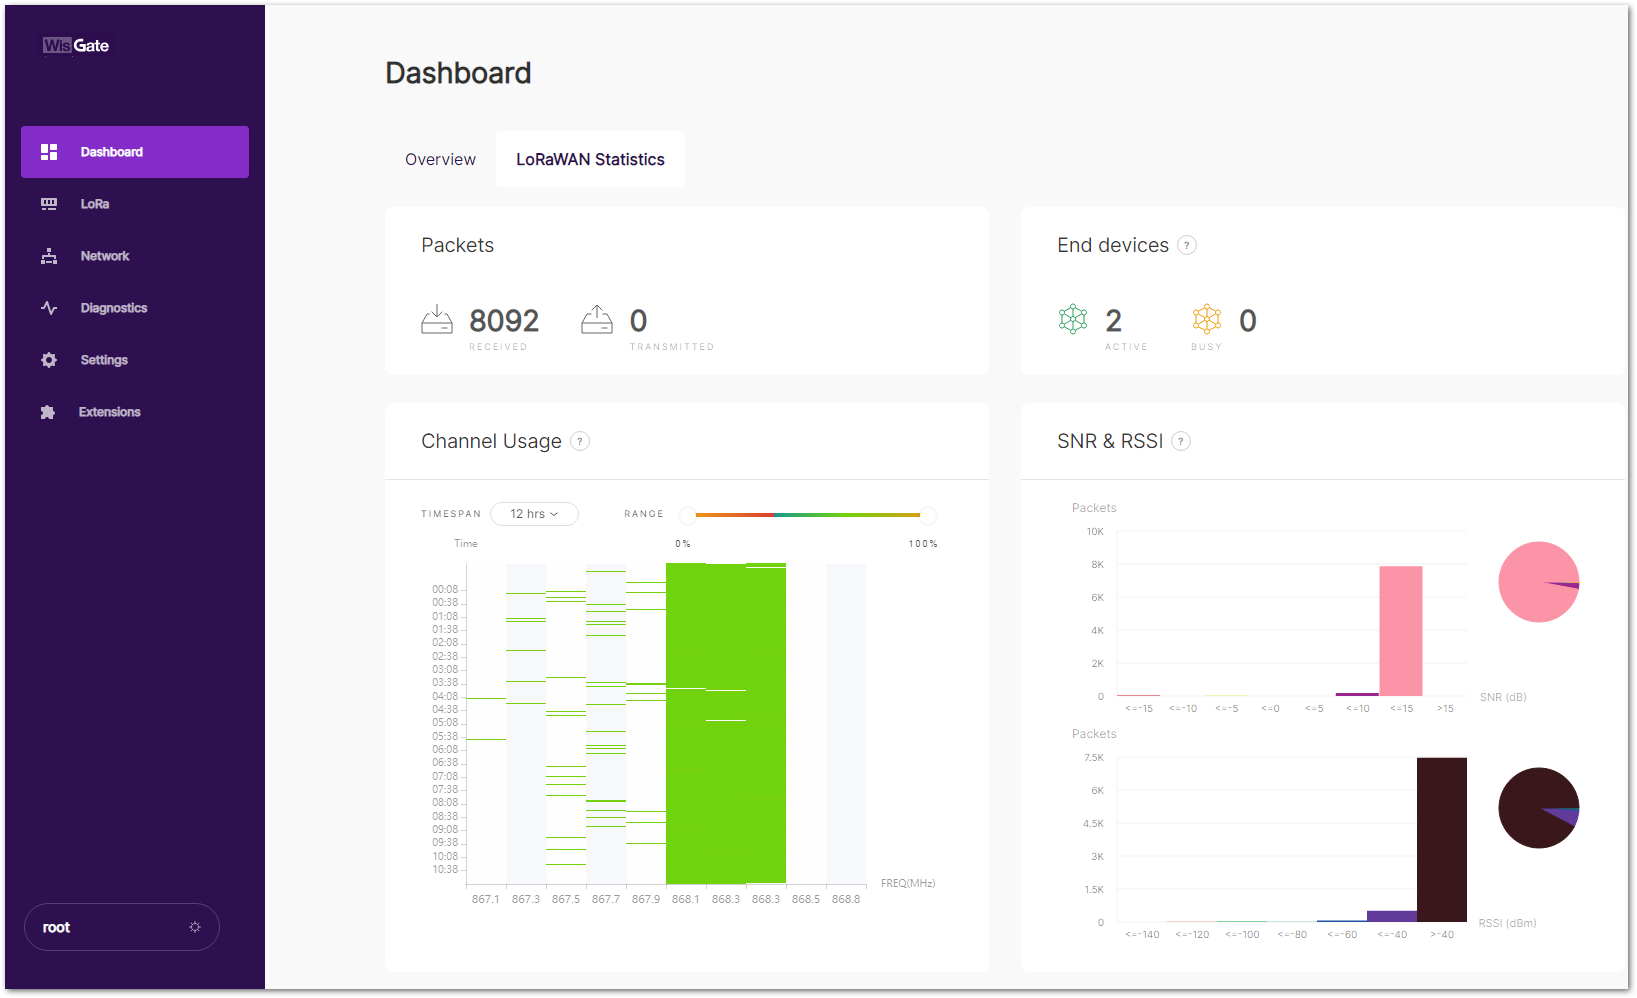
- Click Set password to continue. You will be redirected to the LoRaWAN Statistics page.
- For future logins, use the password you set. The default login username is root
- Open a web browser and enter the IP address:
Connecting through Wi-Fi:
-
Log in to the Web UI, go to Network > WAN > Wi-Fi.
-
Expand the Wi-Fi section and click on Settings. Ensure the Interface is enabled.
-
Click the Scan button to select your ESSID, or manually enter the ESSID of the network by clicking Enter network (E)SSID manually.
-
Choose the correct Encryption method and enter the appropriate Key/Password.
- Assuming you have entered the correct parameter values, you should receive an IP address assigned by your Wi-Fi router's (AP) built-in DHCP server. You can use this new IP address to log in via a web browser..
Confirming Gateway Connection:
Do: Provide the gateway mac address to your IT team prior to connection.
Don’t: Press the small RESET button -This will clear the PathSpot configurations of the Gateway and will no longer be able to connect

Flicker: Data receiving and sending
If all of the above steps fail and the gateway LoRa, WLAN, and PWR LED don't turn on, please contact support@pathspottech.com . Make sure you have the details of the troubleshooting steps followed.
LoRaWAN Temperature Sensor:
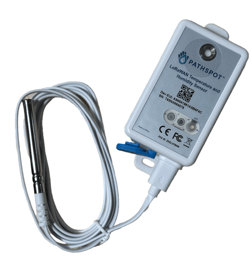
Note: Your sensor includes a USB-C probe designed for specialty use only. To activate this probe, please contact PathSpot Support at support@pathspottech.com . If you do not need the probe, simply discard it and ensure the blue connection cover is securely closed.
Pairing Sensors to Gateway
Ensure the gateway light is solid green before attempting to connect the sensors. This indicates an active Wi-Fi connection, which is required in order to pair the sensors to the gateway.
On the LoRaWAN sensor(s), press and hold the button on the front of the sensor (circled above) until the light flashes green and then flashes red once.
- Contact support@pathspottech.com if no lights appear.
Mounting the sensors on your units:
- Best Placement: Install the sensor inside the unit near doors, as this area experiences the most temperature variation.
- Preferred Installation Method: Use the provided zip ties for the simplest installation and easy replacement.
- Alternative Installation: If zip ties are not an option, use the provided adhesive (Magnets available upon request). Before applying, thoroughly clean the surface with a degreaser or your preferred cleaning product, then dry completely. Press and hold the sensor firmly in place for 30 seconds to ensure a secure bond.
(Optional) Using the USB-C Probe:
- If you plan to use the probe, please notify the PathSpot team. Otherwise, discard it.
- To use the probe, connect it to the sensor via the USB-C port at the bottom.
- Secure the probe cable with a zip tie or bread tie to keep it tidy and prevent cross-contamination.
Scan this QR Code for additional tips!

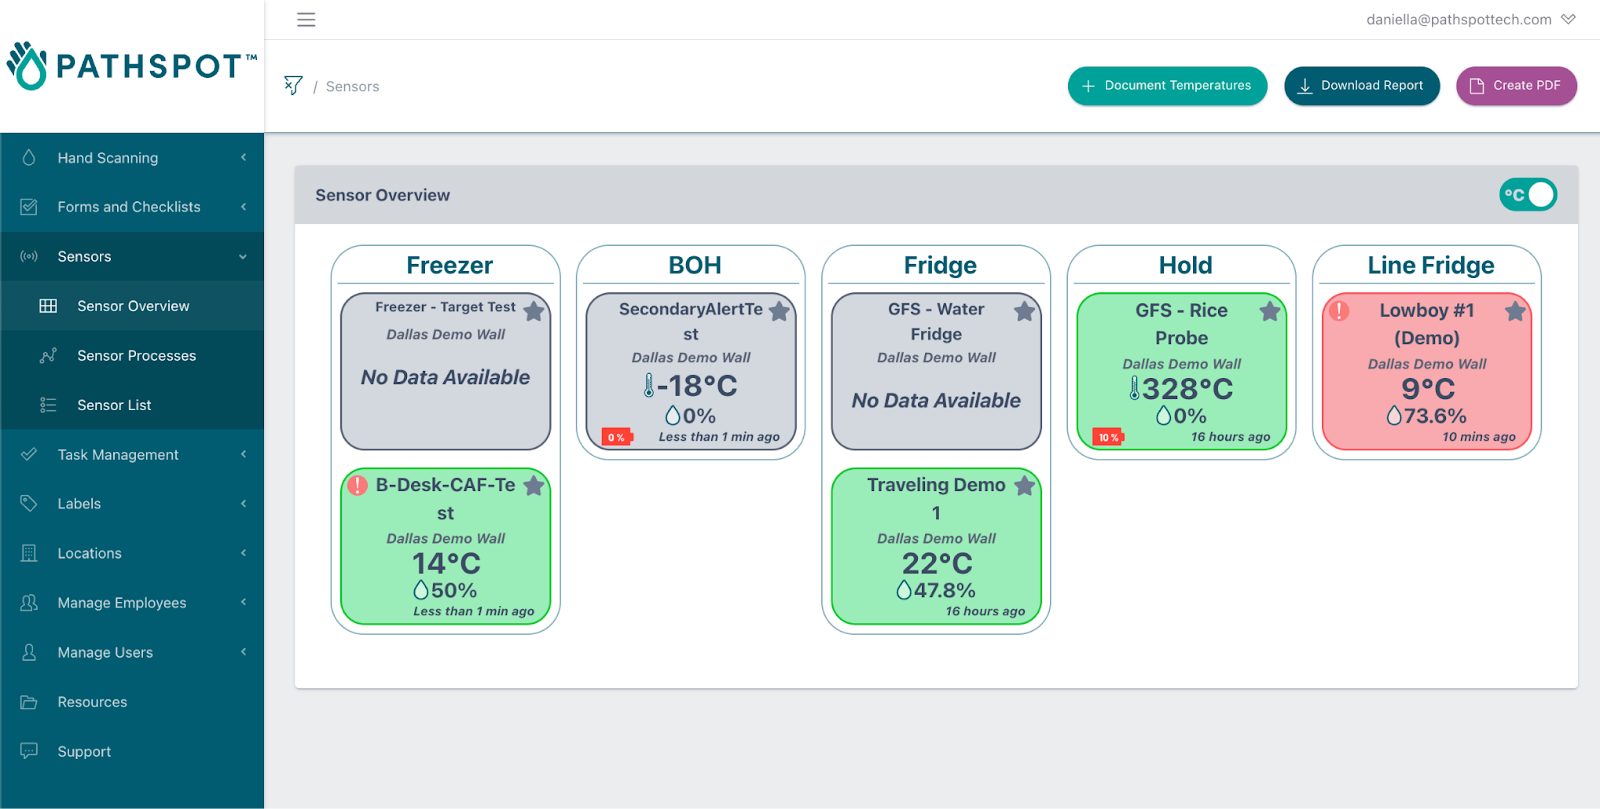
Confirm Sensor Pairing:
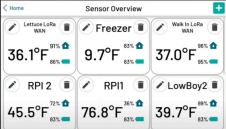
Login to the PathSpot Dashboard (pathspot.app) and verify sensor connection on the Sensor Overview page. Sensors send a temperature reading every 20 min.
- Grey Tile: Sensor is pending connection or it's been 3 days or more since the last reading.
- If this is the case, long press the sensor button until the light flashes green and then flashes red once.
- If the sensor light doesn't turn on, contact support@pathspottech.com as a battery replacement might be needed.
- Green Tile: Sensor is online and within set temp limits.
- If limits have not yet been set please reference our alert configuration article.
- Red Tile: Sensor is online and currently out of range.
If a PathSpot HandScanner has also been installed, on the HandScanner screen, tap on “Sensor Overview”. Your connected sensors will display a temperature reading (this can take up to 5-20 minutes after sensor pairing).
Once your gateway is connected, you're ready to install and activate your sensors!
This guide has instructions about how to activate your sensors.
This guide has best practices on placement/installation.