-1.png?width=500&height=125&name=PathSpot-Logo-RGB-Horizontal-1.0.0-1-e1600793653493%20(1)-1.png)
🍔 Getting Started
Learn how to set up, configure, and use DigitalPrep to digitally manage ingredient holding times and improve food safety compliance.
Click here for the PDF downloadable version
Note: Functionality for this product is permission-based. If you believe you should have access to something and do not, please contact support@pathspottech.com and include the name of another active account administrator who can verify and approve the permission update.
📚 Article Table of Contents
- 📖 Overview
- 📱 Device Requirements
- ⚙️ Initial Tablet Setup
- ⬇️ Download & Register SafetySuite
- 🔒 Configure Your Tablet
- 🏪 Install the Tablet
- 🚀 First-Time Setup
- 🏠 Using the Home Screen
- ➕ Add Ingredients
- 🔄 Move & Remove Ingredients
- 🧀 Managing Ingredient Stacks
- 📦 FIFO Best Practices
- 🧽 Cleaning & Maintenance
- ❓ Troubleshooting
- 📞 Support
📖 Overview
DigitalPrep is a digital ingredient holding-time management solution within the PathSpot SafetySuite application. It replaces most manual shelf-life labels with a streamlined digital workflow, enabling kitchen teams to quickly identify which ingredients are fresh, approaching expiration, or need to be moved to new tables.
This also eliminates the need for employees to waste time on applying, removing, and interpreting hard-to-read shelf-life labels. Speeding up operations while also ensuring compliance!
Using DigitalPrep helps restaurants:
✅ Reduce manual labeling
✅ Improve food safety consistency
✅ Track ingredient holding times in real time
✅ Spend less time cleaning adhesive labels
✅ Improve kitchen efficiency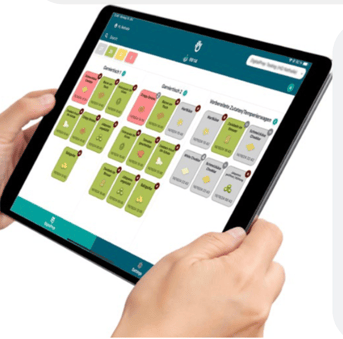
📱 Device Requirements
Before installing DigitalPrep, verify that your tablet meets the minimum requirements.
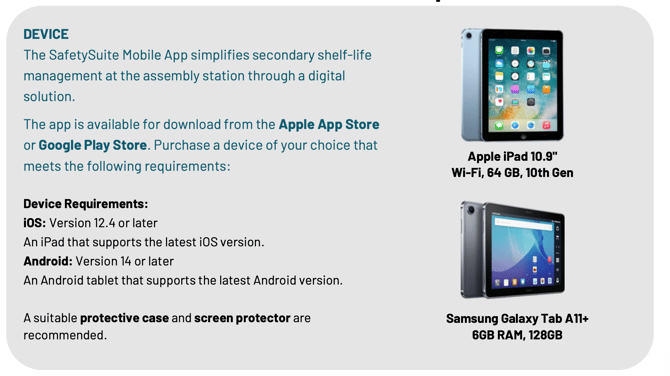
🛡️ RecommendedInstall a protective case and screen protector to help prevent accidental damage.
📖 Initial Tablet Setup & Configuration
Complete these steps before downloading the SafetySuite app.
1️⃣ Turn on the tablet
Power on the tablet and complete the standard device setup.
2️⃣ Connect to Wi-Fi
Connect to your restaurant's Wi-Fi network to activate the device and install any available software updates.
3️⃣ Sign in using an Apple ID or Google Account
💡 Best Practice
Create a new account using your restaurant email instead of a personal account. This makes future management much easier.
⬇️ Download SafetySuite (Apple 🍎 & Android 🤖)
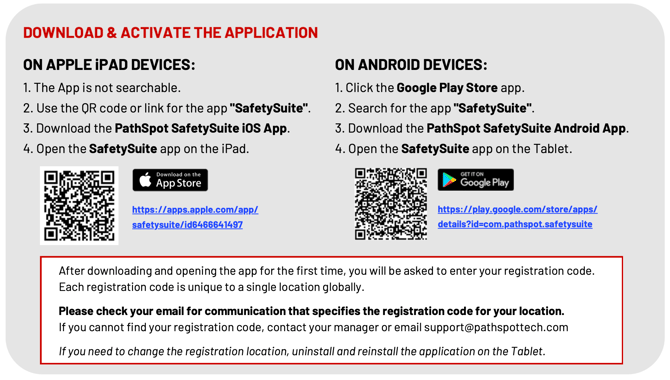
🔑 Login & Activation
When opening SafetySuite for the first time:
- Enter your restaurant registration code.
- Select your assigned user from the listed dropdown (if your name or login is not here please contact PathSpot Support
- Create your PIN
- Tap the DigitalPrep tab on the bottom of the device. If this tab is not visible contact PathSpot Support.
- Verify your subscription is active.
⚠️ Important
Save your PIN in a secure location. Every shift manager should know it, as it is required each time the application is opened.
⭐ Advanced Settings For Optimal Use
For the best experience, we recommend the following settings:
✔ Disable Auto-Lock
Prevent the tablet from locking so SafetySuite remains visible at all times.
- Open Settings.
- Tap Display & Brightness (or the equivalent display settings on your device).
- Set Auto-Lock to Never.
Note: Menu names and settings may vary depending on your tablet model and operating system.
✔ Keep Your Tablet Charging
Keep the tablet connected to power whenever possible to ensure uninterrupted operation.
✔ Launch SafetySuite Automatically (Optional)
You can configure your tablet to automatically open SafetySuite at the beginning of each workday.
On iPad (Shortcuts App)
- Open the Shortcuts app.
- Tap Automation.
- Tap + (or New Automation).
- Select Time of Day.
- Choose your preferred start time and set the repeat schedule to Daily.
- Tap Next.
- Select Open App.
- Choose SafetySuite.
- Tap Done.
On Android
Use Settings > Modes and Routines (or your device's automation feature) to create a routine that opens SafetySuite at your preferred time each day.
Note: Available automation features and menu names vary by device manufacturer.
✔ Enable Guided Access (iPad)
Guided Access helps prevent users from accidentally exiting the SafetySuite app.
To enable Guided Access:
- Open Settings.
- Go to Accessibility.
- Turn on Guided Access.
- Set a passcode.
- Open the SafetySuite app.
- Triple-click the Home or Side button.
- (Optional) To disable touch in specific areas of the screen, draw a circle around those areas with your finger. You can move, resize, or remove the highlighted area by tapping X.
- Tap Start.
✔ Connect to Wi-Fi Weekly
Connect your tablet to Wi-Fi at least once each week to receive the latest SafetySuite updates and improvements.
🛠️ Installation & Mounting
Install the tablet where employees can easily view it while working.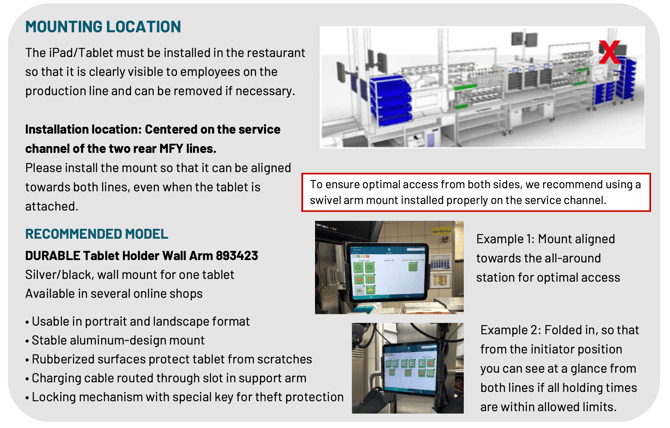
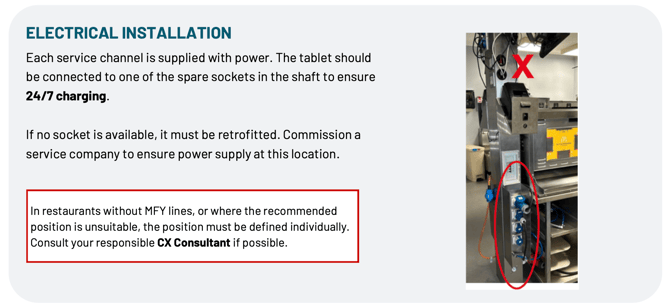
✅ Recommended Mounting
- Centered on the service channel
- Visible from both production lines
- Swivel arm mount preferred
- Connected to continuous power
💡 A swivel mount allows the screen to face either production line for easier viewing.
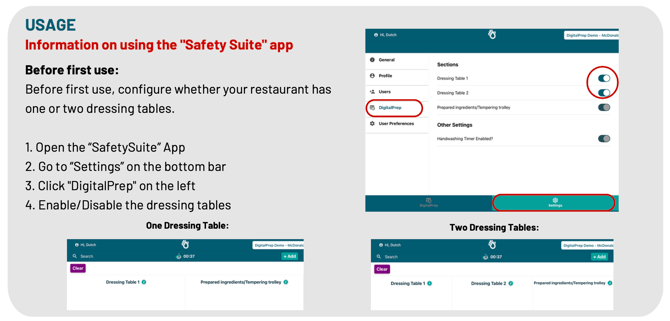
⬇️ First-Time Setup
Before using DigitalPrep for the first time:
- Open SafetySuite
- Tap Settings
- Select DigitalPrep
- Configure whether your restaurant uses one or two dressing tables.
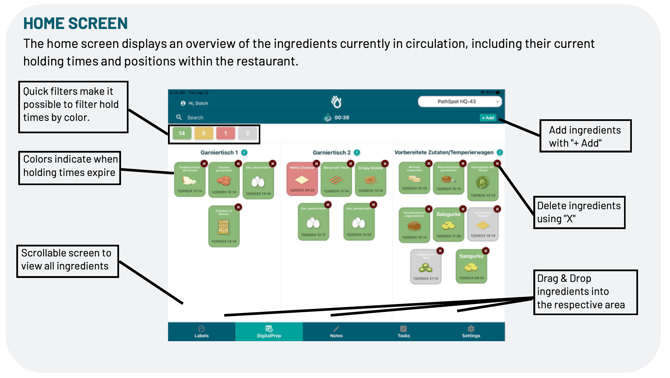
🏠 Home Screen Overview
The Home Screen provides a live overview of all active ingredients, including:
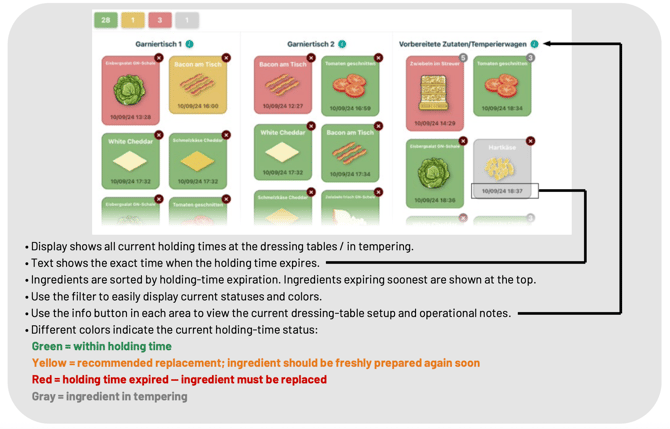
- 🟢 Ingredient status (color-coded)
- ⏰ Remaining hold time (displayed on each tile)
- 📍 Current location (top-right corner)
- ➕ Add Ingredient (below the location)
- ❌ Delete Ingredient (top-right corner of each ingredient tile)
- 🔄 Drag-and-drop movement (move tiles from right to left)
- 🔍 Quick filters (filter by color-coded status)
Further directions on each in subsequent sections:
➕ Adding Ingredients
Adding ingredients only takes a few seconds!
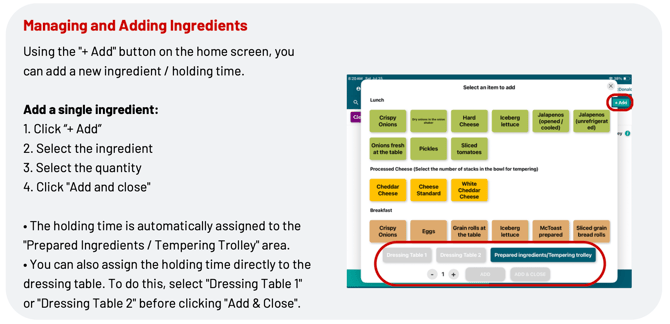
To add a single ingredient
- Tap + Add
- Select the ingredient
- Choose the quantity
- Tap Add and Close
By default, ingredients are added to the Prepared Ingredients / Tempering Trolley.
You can also assign them directly to a dressing table during creation.
To add a Multiple Ingredients
- Select the ingredient.
- Choose the required quantity.
- Click “Add.”
- Select the next ingredient.
- Choose the quantity for the next ingredient.
- Click “Add.”
- Repeat the process for all remaining ingredients.
Once all ingredients have been selected, they will be assigned directly to the “Prepared Ingredients / Tempering Trolley” area by selecting either “Close” or “Add and Close.”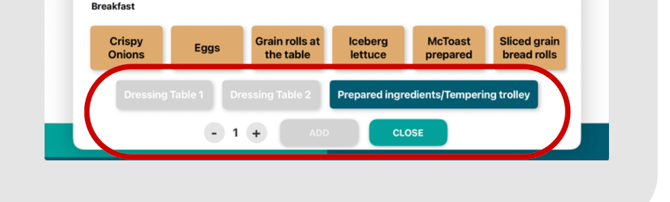
Adding Cheese
Cheese is prepared in multiple stacks within large GN trays and is therefore displayed differently.
- Click “+ Add.”
- Select “Cheddar Cheese” or “Cheese Standard.”
- A window opens where you can enter the number of stacks placed into the GN tray for tempering.
- Click “Add and Close.”
The GN tray with the selected number of cheese stacks is now displayed in the “Prepared Ingredients / Tempering Trolley” area.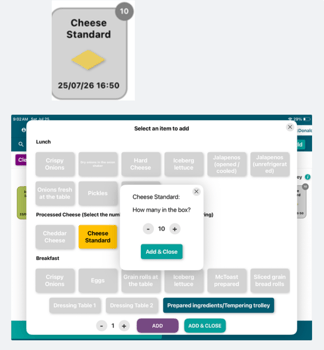
🔄 Moving Ingredients To The Dressing Table
Move ingredients by simply dragging an ingredient card to the desired dressing table.
This keeps DigitalPrep synchronized with your kitchen workflow.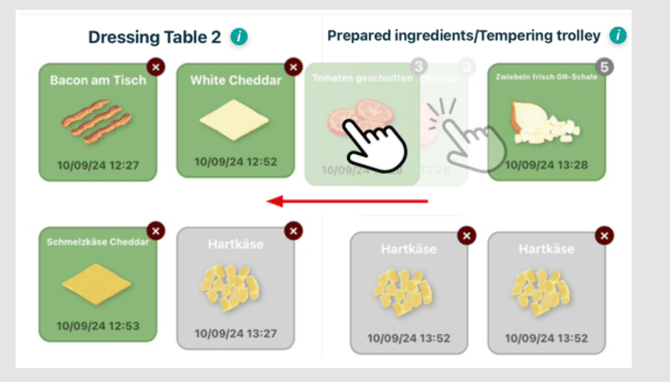
🧀Prepared Ingredients (more than 2x of the same ingredient in one area)
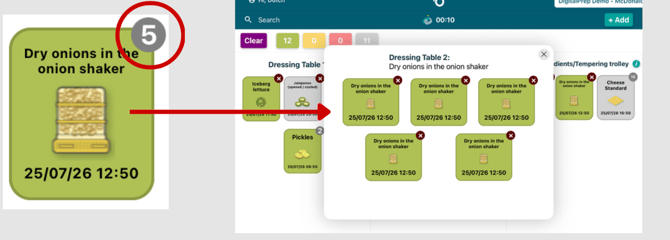
Managing Ingredient Stacks: If multiple containers of the same ingredient are prepared:
📦 They are grouped into a stack.
⏰ The earliest expiration appears first.
🔢 A badge displays the quantity.
👆 Tap the stack to view individual holding times.
As mentioned in the above "Adding Cheese" section; cheese is managed by entering the number of prepared stacks during creation.
❌ Delete Ingredients
When an ingredient has been used or replaced:
- Locate the ingredient card.
- Select the X.
- Remove the ingredient.
Keeping ingredient lists current ensures holding times remain accurate.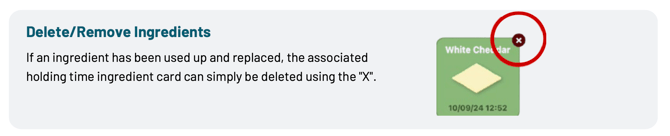
🔄 FIFO Best Practices
Always follow the First In, First Out (FIFO) method. Ingredients with the earliest expiration date or holding time must always be used before newer product.
Maintaining proper organization at the dressing table, prep area, and refrigerator is essential to ensure holding times remain accurate and the correct ingredient is always used first. Consistent placement of ingredients helps prevent confusion and supports food safety.
General Guidelines
- Always organize ingredients so the oldest product is the easiest to access.
- Ensure the physical placement of each container matches its assigned holding time.
- When a container is emptied, remove its holding time from the tablet before repositioning the remaining containers.
- Never place newer product in front of or on top of older product unless specifically instructed below.
🧀 Processed Cheese (Cheddar & White Cheddar)
- The top tray is always the tray that should be used first.
- When a new tray is prepared, place it underneath the existing trays.
- Move the remaining trays upward as older trays are depleted so the oldest product always stays on top.

🥬 Iceberg Lettuce at the Dressing Station
When two trays are stocked at the dressing table:
- Always use the tray closest to the toaster first.
- Once that tray is empty, delete its holding time from the tablet.
- Move the adjacent tray into the first position.
- This ensures the holding time displayed always corresponds to the correct container.

🥬 Iceberg Lettuce & Fresh Onions in the Refrigerator
- Arrange trays so the top tray has the earliest expiration time.
- Always use the top tray first.
- Place newly prepared trays underneath the existing trays.

🍅Tomatoes & Other Tempered Ingredients
When multiple trays of the same ingredient are stored in the tempering area:
- Position the tray with the earliest expiration (expiring first) time furthest to the left.
- Place newer trays to the right or underneath, depending on the storage setup.
- Always rotate product from left (first to expire) to right (latest to expire) and from top (first to expire) to bottom (latest to expire) to maintain proper FIFO.
Left & Top: Use first.
Right & Bottom: Use last (move items up and left as ingredients are used).
🧽 Cleaning & Maintenance
To keep the tablet clean and safe for use:
🧼 Wipe the display every 4 hours, or more frequently if needed.
Use:
- A disinfectant wipe
- A cloth dampened with disinfectant
❓ Troubleshooting
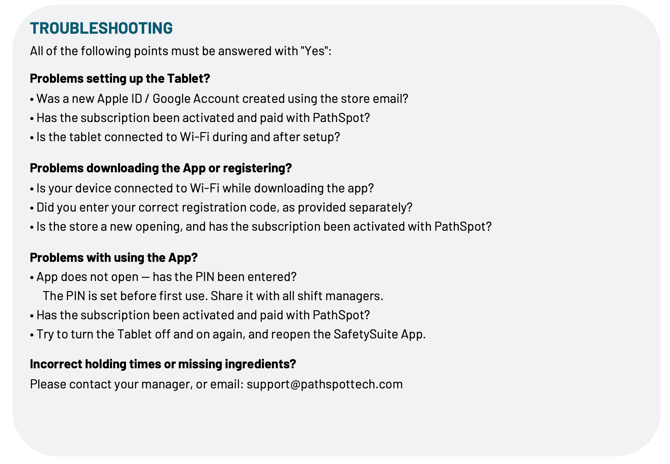
📞 Need More Help
If you continue experiencing issues, contact your restaurant manager or PathSpot Support for assistance (support@pathspottech.com)